
DeathLoop Win10
Friday, 2nd, October, 2020
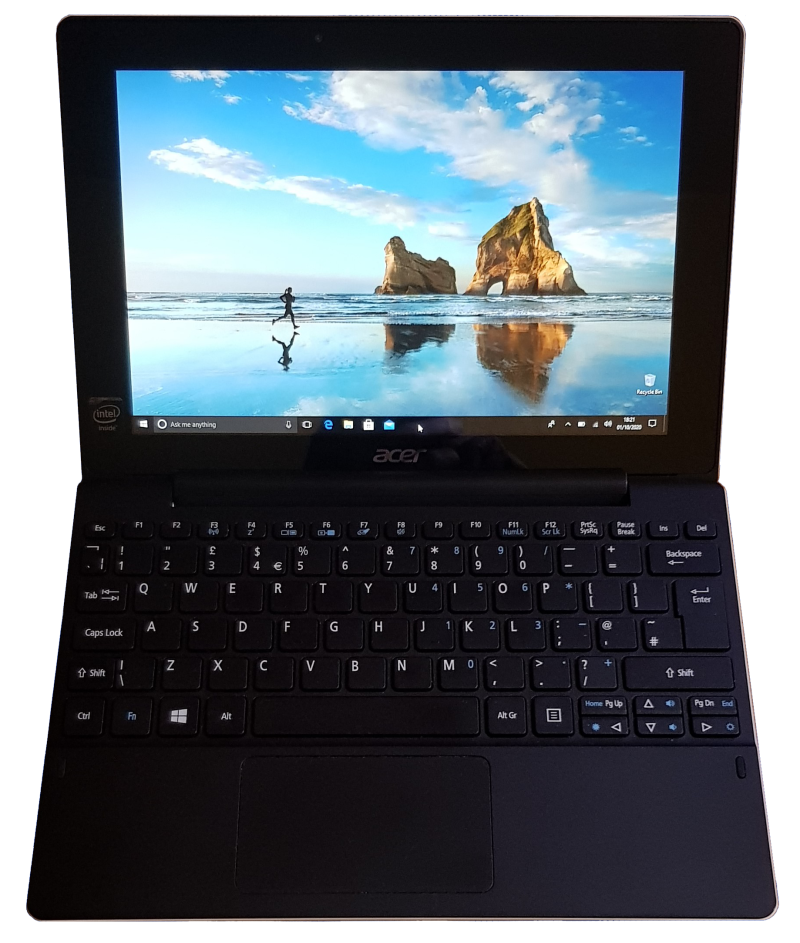
My recent experiences with Microsoft Windows 10 on an Acer Aspire Switch 10-E tablet PC.
Over the years I’ve had an interesting experimental experience with Microsoft Windows 10. I’ve never installed it or bought it for any serious machine, but did, early on, try it out on a small tablet PC to see whether it was worth further installation.
Despite the passage of years the repeated published issues with Windows 10 installations around the world have reinforced my decision to wait-and-see, a lot of waiting and seeing. In recent weeks that has been further proven with new experiences when my own tablet got locked out in a loop of doom.
The Beginning
Being a small tablet it was never really up for heavy work or full installations. Anyone with deep knowledge and experience of Windows in its various incarnations, good and evil, knows how much space it demands for a fully-working installation. A tablet with a limit of only 32 gigabytes on a lightweight processor was never a serious contender for Windows-friendliness. Nevertheless the ability to load and run a lightweight version of Windows 10 Home was still a fair choice for early evaluations.
However, there is one issue with Windows 10 that came into conflict with the lightweight nature of my tiny tablet: its insistence on carrying out updates automatically. Although automatic updates are a good way to guarantee an installation stays safe and secure the fact that the tablet cannot absorb them means repeated update failures. This reached the point where no major system update could be installed and Windows repeatedly failed. This was when it tried to install “Feature update to Windows 10, version 1903”.
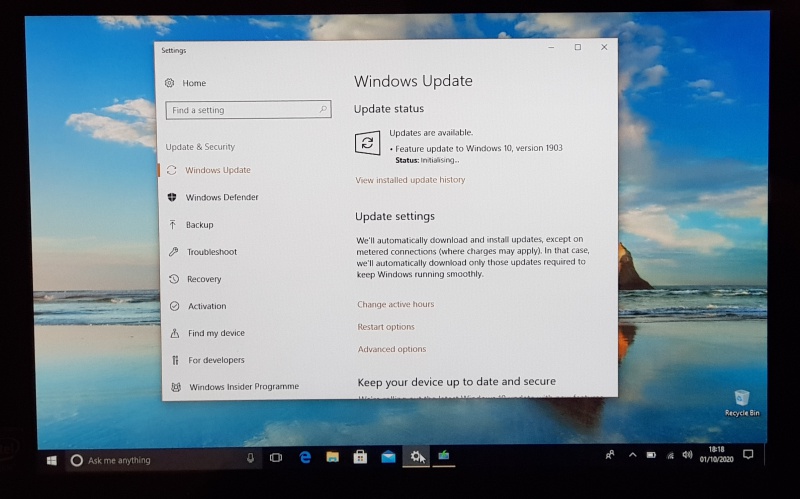
Time and again this would fail, either because of the message “This PC cannot run Windows 10”, or because there wasn’t enough room for it to carry out the update, despite the fact that there was a memory card installed with plenty of space, a location Windows would not recognise.

And then, a few weeks ago it tried another update. And that’s where the loop of doom began.
New Update, Failure & The Boot-up Loop of Doom
Somehow, probably a new smaller patch that Windows 10 managed to slip past me, it was now able to recognise the presence of the extra memory card and wanted to have another go at the major update. So, yes, I fired it off to work its evil magic.
The attempt took a couple of hours and I left it humming away to itself late into the night. In the morning it was still working. On closer inspection I discovered why: the update had failed and Windows 10 was trying to revert and “Attempting to recover installation…”
During this the tablet was in boot-up and “Undoing changes to your system…”, then rebooting, and repeating “Undoing…” and again, and again. A loop of doom.

There was no way to break into the loop, no way to get past this point, endlessly repeating the boot-up and attempt to revert the system. Yes, Windows was up to one of its legendary tricks.
F8 Safe Mode Has Vanished.
To make Windows 10 boot quicker Microsoft have played a clever technical trick: they’ve disabled the traditional emergency recovery process. Anyone with long experience knows that during a boot-up of older Windows systems you see a long dialogue of the start-up processes, reports of all your hardware and numerous options to access your BIOS (Basic Input/Output System), hardware drivers and Safe Mode, you can slap down on the F8 key during the boot-up and switch through to Safe Mode.
Not in Windows 10 you can’t, Safe Mode and everything else slowing down the start-up process has gone, vanished, locked out. Yippee!
Recovery Mode – Getting Back into Windows 10, eventually, maybe.
There IS a recovery process in Windows 10, but first you have to find it and delve deep into the deeper system settings, if you know where to look. Windows 10 (Home) is so “friendly” for novice users that all the essential technical controls are hidden and you have to know what questions to ask the system to find the right settings. It took me a while to discover this, thanks to a couple of fora online and tips from others who’ve been here before me.
The recovery process goes something like this (this only applied to my tablet, you will have other fun with this process on your machine, enjoy):-
Hit Alt-F10 to get into a basic settings screen. Do this before any splash screen starts to appear.
Alternatively it may be possible to rapidly, repeatedly hammer F2 during boot-up and get into the basic settings (a little more about this at the end).
In my case there was little on that screen other than the instruction to hit the Windows Key to go into Settings.
The problem I found was that the Windows key on my small keyboard didn’t work. Instead I found there was a small separate Windows key on the right-hand side of the tablet screen.
This got me into the SetupUtility Settings, for all basic security and access. Time for some resetting to unlock the secret back doors.
To gain some access back into the tablet I needed to do the following:-
In the “Boot” selection I had to “Disable” the “Secure Boot”. This is essential because Windows 10 tries to lock the boot process and prevent alternative ways to boot a machine. And I’m going to be doing just that, wait and see.
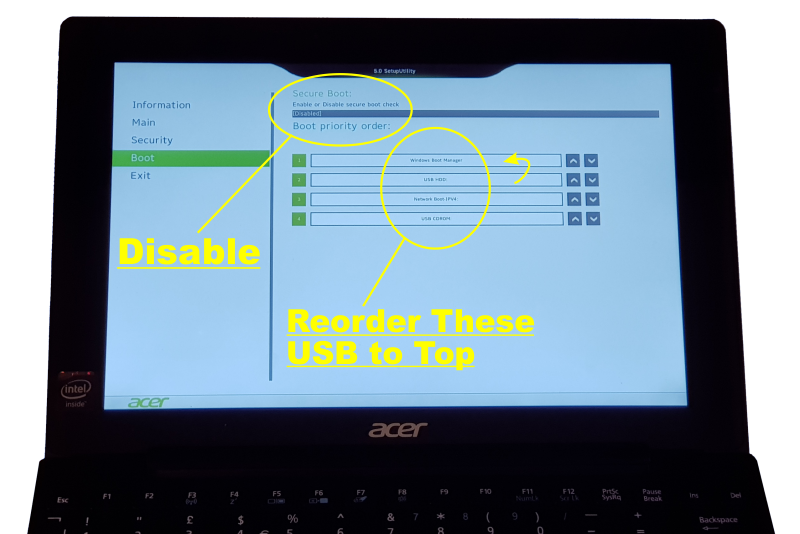
I could also change the boot priority order to bring the USB boot options to the top. We’ll get to this fun part in a few minutes.
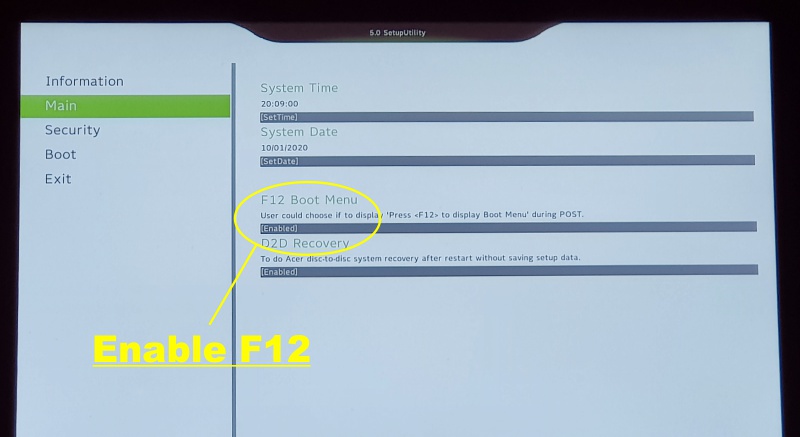
In the “Main” selection I had to “Enable” the “F12 Boot Menu”.
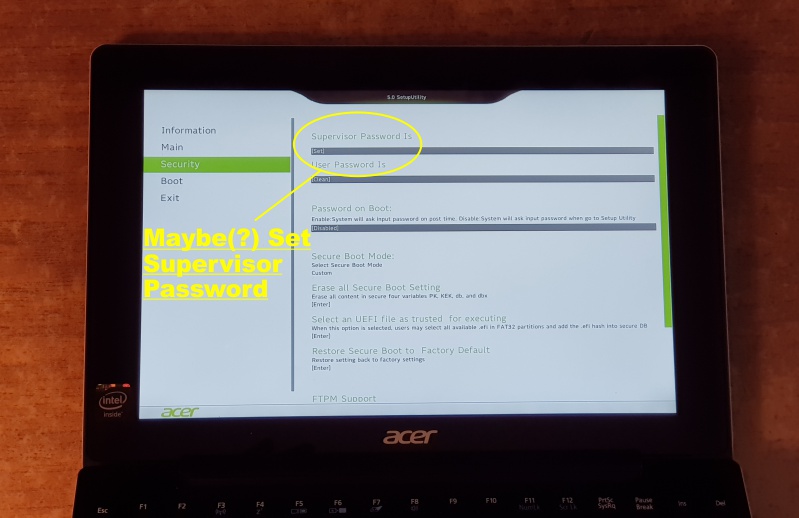
In the “Security” selection it may be a good idea to set your security password here. This appears to enable the SetupUtility settings so you don’t need to go through the first bluescreen off Alt-F10 again.
And finally, save changes and exit.
This has achieved nothing to solve the problem but has opened the gates to some real recovery options.
Recovery Drives
The alternative to the old F8 Safe Mode includes a Recovery Drive option for Windows 10. This is an external drive, such as a USB pen drive, which you set up with all the recovery options and core system files for Windows 10.
A Recovery Drive allows you to use the emergency recovery features to try and break any deadlocks, such as my little loop of doom. If you don’t already have one or two spares I recommend creating one because we all know what a little monster Windows is.
Now for the fun bits.
Remember all those boot settings to enable in the SetupUtility (on my machine, yours will be different). This is how I got into the Recovery.
As the loop of doom was launching at the beginning of the boot process I needed F12 to be active so I could switch the boot-up over to the pen drive and get into recovery mode.
Nice.
Unfortunately a few other little Windows tricks foiled my attempts.
Restore Points
The only way I could recover my system through the Recovery Drive might have been to use a restore point on the tablet’s core system drive (eg. drive C:\). Unfortunately Restore points aren’t enabled by default on system drives in Windows 10.
So I had no restore point to recover the drive.
And I had some potentially critical data on that drive.
If there is no restore point my only option is to make a clean install off the Recovery Drive. This will wipe everything, all applications and all data.
The Joy of Windows.
Eeek! SAVE MY DATA!!!!
I’ve got data!
I need to save my data!
I can’t get into the tablet!
It’s time to bring in the Big Guns: Linux, mwa-ha-ha-haaaa!
Yes, I will not be foiled.
I will save my data!
Linux, hurrah!!
And another pen drive.
Fortunately rummaging around my many collections of old USB pen drives I found a double-ended one with a plug for the small USB connection on the left of my tablet screen. this left my full-sized USB port on the keyboard free for other work.
Now to create a suitable Linux boot drive on a pen that will work here. Interesting…
Linux
First steps are to select a suitable Linux installation and download it to make a bootable pen drive.
I had and tested a number of flavour based on the Ubuntu distribution but this is not the ideal Linux for this challenge.
TECHNICAL LESSONS:
For a Linux installation to work and boot this tablet, and possibly other Windows installations, you need a full distribution. I tried Lubuntu initially because it has a lighter base and might have worked, but when I finally got it to work it lacked some of the heavier file management applications I will need.
Any full distribution should be a 64-bit installation with special support for 32-bit UEFI booting. There are some distributions that support this. Ubuntu doesn’t but there is an easy solution.
32-BIT EFI:
To boot the Windows drive needs a specific component. If you do not have this in your boot drive then the boot will fail. This is a file: bootia32.efi, if this file is missing from your boot process then the Linux will not boot and just flash you a naughty message –
Could not locate “EFI\BOOT\bootia32.efi”: [14] Not Found
FINDING BOOTIA32.EFI:
Got a Recovery Drive for Windows 10?
If so then you already have a copy of this file.
Goto your Recovery drive.
Look in the folder \EFI\BOOT\ and you will see the bootia32.efi file.
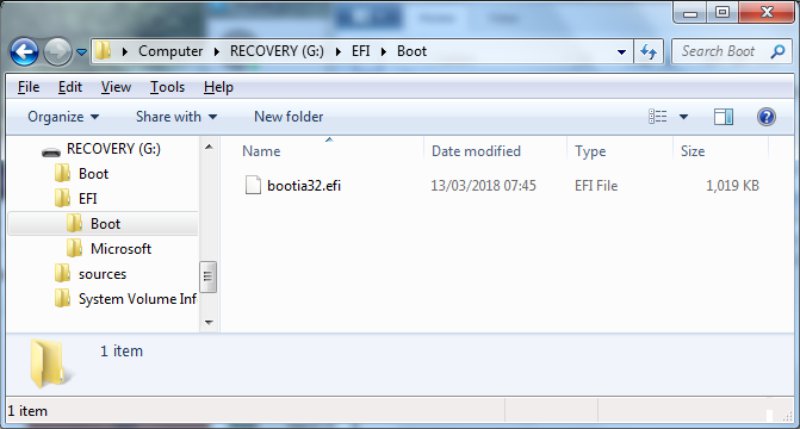
Copy this somewhere to load into your Linux pen drive once you have created it.
Load it into (Linux)\EFI\BOOT\
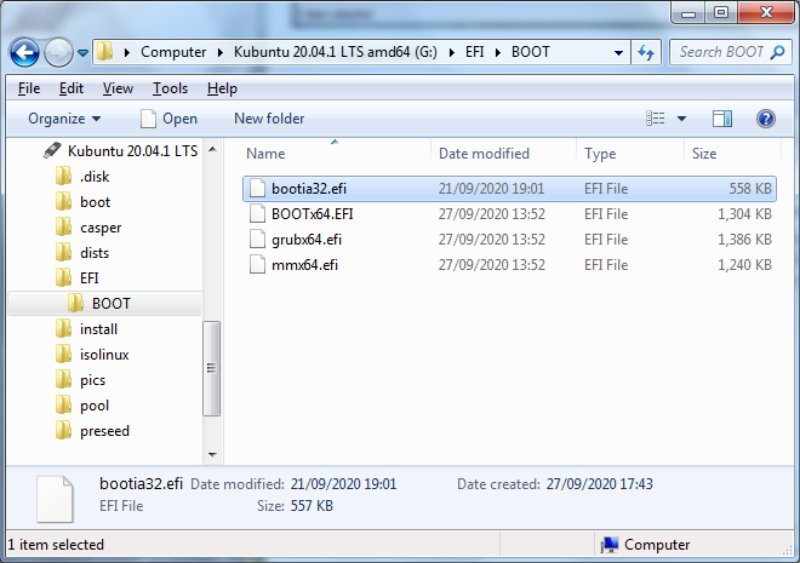
You now have a Linux that will boot safely. Well I did, I can’t talk about your problems. Have fun.
If you haven’t got a Recovery Drive, er, ask a friend with Windows 10 to make one for you.
(NOTE: not all Recovery Drives are created equal, each has to suit the computer it’s aimed at, so my Recovery Drive for the tablet is set up for this tablet and wouldn’t easily work on any major PC, maybe. If you want to try feel free to trash a PC and write your experiences up.)
Creating Linux-to-go
To create your Linux boot drive you need to find and download a distribution. That’s a couple of gigabytes of data. This is the option I took this time around, two flavours of Ubuntu: Lubuntu then Kubuntu. You can play around with any other distribution you wish (see Technical Lessons above).
You’ll need a suitable USB drive with around 4 gig. free.
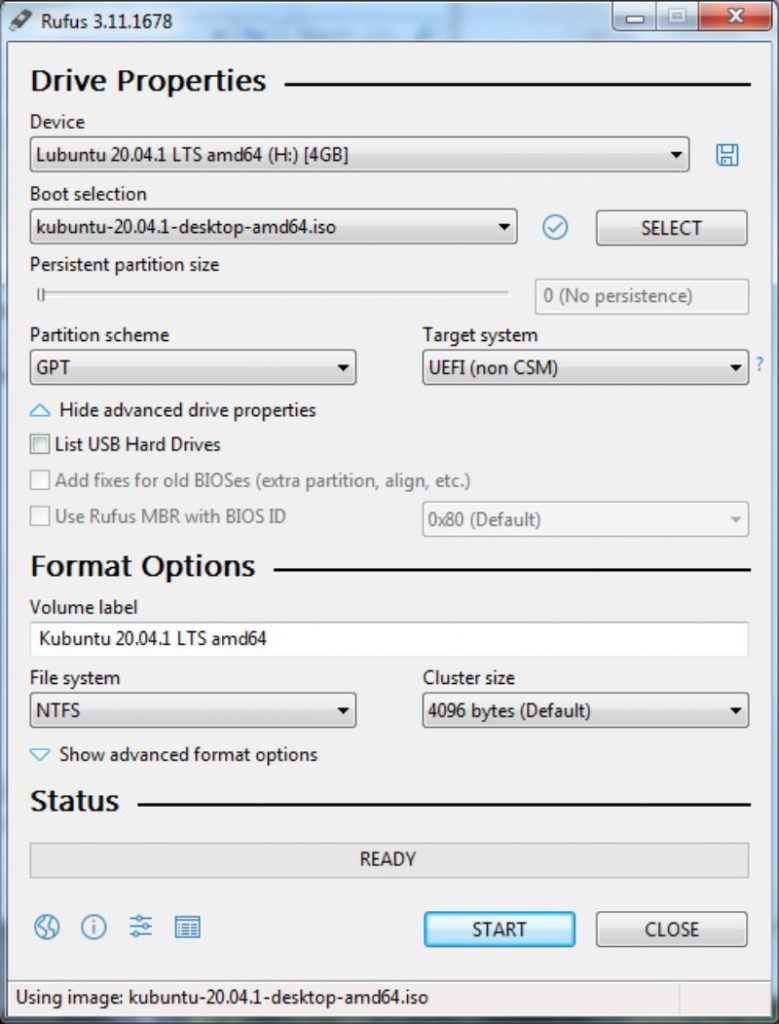
And download a copy of the Rufus application: http://rufus.ie/
You don’t need to install Rufus, it runs without needing installation.
Now run Rufus. It will throw up assorted messages which you can interpret through the help posted on the Rufus web site.
This will create a bootable USB pen drive.
Here are some key settings for you:-
Partition Scheme: GPT
File System: NTFS
Persistent Partition Size: (optional if you want to copy items over for long term use of the Linux pen drive).
Using a full distribution copy of Ubuntu, not a lightweight flavour, I locked and loaded to shoot into my doomed tablet.
Wo-hoo! My data!
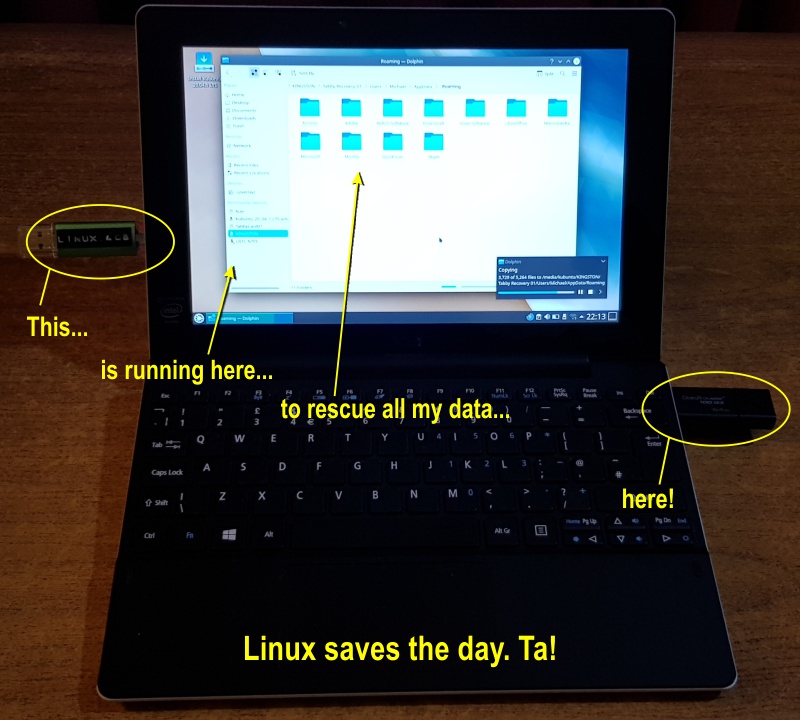
Saving My Data
With the Linux running off the small USB drive on the side of the tablet I could use the full-size port for a backup drive.
Fortunately I also has assorted old components, USB hub and leads to run mouse too.
The hub wouldn’t run off the tablet’s keyboard alone – there wasn’t enough power here to drive the hub and attachments, but with my old power splitter lead I could piggyback the lead off another old laptop for the USB power cable.
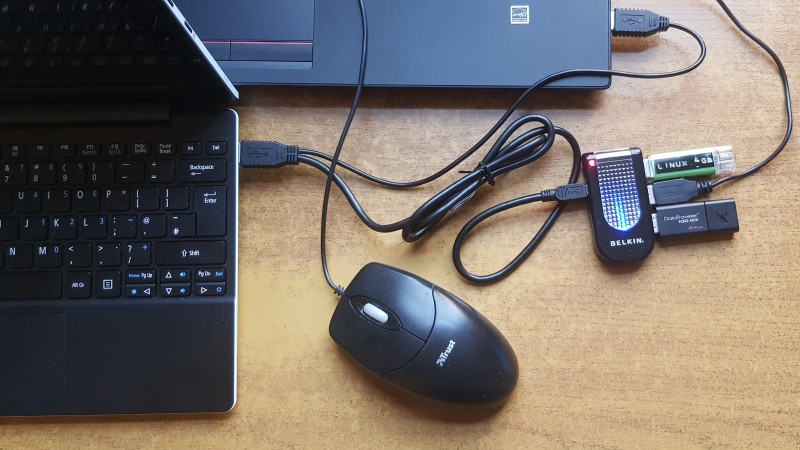
Now I’ve got Linux, a mouse and a data pen to save my data off the doomed tablet now and in the future.
Final Recovery
There was only one final option to break the original issue: a clean reinstall of Windows 10.
Returning to the Recovery Drive (remember to make one for your PC, and keep it up-to-date on a regular basis) it was time to bite the bullets and fire the faulty fiend.
Windows 10 was doomed.
After reinstall and new settings I have a completely clean tablet.
Not just clean of the problem, but clean of a lot of the original installation applications and utilities that came with the tablet in the first place.
This might produce problems in the future but my first step was to set up and make at least one restore point for the system drive. No more will that faulty reboot issue spoil my month.
Conclusion
I’m more used to Windows Professional editions, so a lot of the hidden technical features might be more easily available in Windows 10 Professional rather than this cut-down version. The frustration in trying to find all the features, find and activate the restore points, create recovery drives and more is all the product of poor design and I can imagine how difficult it is for a novice to know what to ask and where to go for answers in Windows. And don’t get me started on the really big issues that crop up on the computer press over the stability or security of Windows 10.
It’s taken a few weeks of work to find my way around then through this challenge. Another lesson in why Windows 10 differs so much from old versions and needs to be handled with care.
Creating restore points, making Recovery and Linux drives, making full image backups are all essential for future survival when the next problem crops up.
(NOTE: I did make a full image backup of the original installation, but the backup application’s recovery drive wouldn’t recognise the backup location when I tried booting it, so I could never recover my two-year old backup of the full installation, all that is lost now.)
Finally, an interesting point. When I tested the emergency Alt-F10 function after the clean boot it didn’t work, but rapid-fire of the F2, hammering it repeatedly before and after the splash screen appears, did get me back into the SetupUtility. Strange but true, such is the wonderful world of Windows.
I’m not yet ready to try wiping it all and trying Linux out to see whether that would install better.
And in the future?
Android tablets?
END… for now.
If you found this useful and would like more of my writing try some of my science fiction stories on eBook/Kindle formats. Read all about them on my Stories page. Dragons, Mars, Space Adventures and Bunnies!